Install Twingate in Proxmox
It’s time to ditch your VPN
1. Use Cases for using Twingate
2. Zero Trust
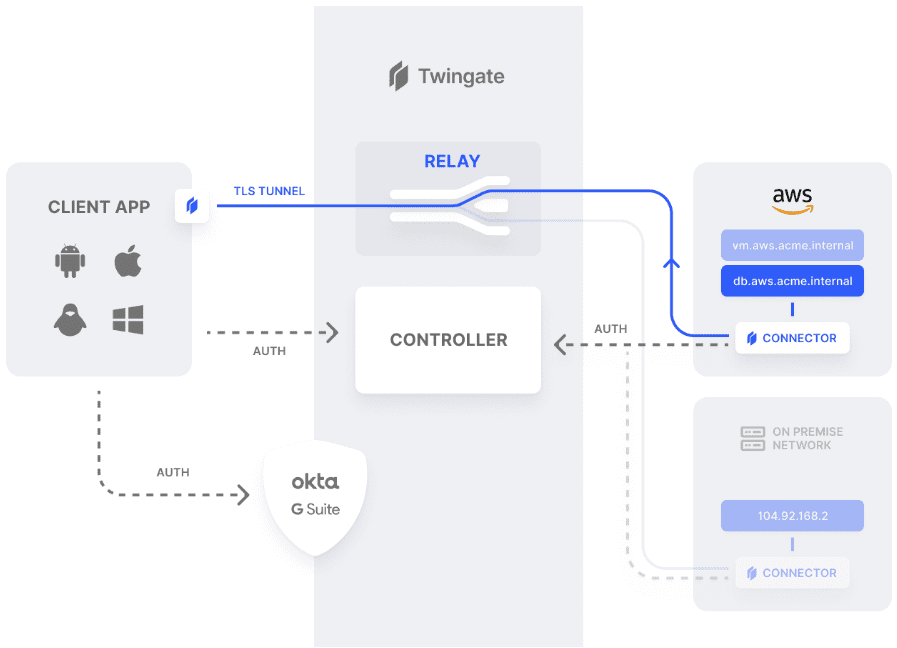
3. How Twingate works

4. Twingate Documentation
5. Is it free for your Homelab ?
See what it costs for a Homelab
6. Create your Free for life Account for Twingate
You need to sign up first : (Don’t worry its free)
Create your Free for life Account for Twingate here
To log in (later)
Login to Twingate
7. Lets get started
7.1 Define a Remote Network
After signing up, log in to your Twingate account and navigate to the Admin Console.
Click on “Networks” and then “Add Network.”
Provide a name for your network and configure the desired settings, such as IP range and DNS settings.
- Click on “Network” in the navigation bar, if needed.
- Next to Remote Networks on the righthand side of the screen click “Add”.
- Select the location of the remote network from the list of options, eg. “AWS”.
- Give the Remote Network a name, eg. “AWS Production VPC”, and then click “Add Remote Network”.
7.2 Create and provision a new Connector
Connectors are Twingate components that are deployed behind your firewall to provide access to private Resources.
Connectors run either as a container or a Linux systemd service. \
In the Twingate Admin Console, click on “Connectors” and then “Add Connector.” Select the appropriate operating system for your server, and follow the instructions to download and install the Twingate Connector on your server.
7.2.1 Open port 443 on Kali linux
Run these commands"
iptables -A INPUT -p tcp -m state --state NEW -m tcp --dport 443 -j ACCEPT

# to list all rules
sudo iptables -S
The admin console has ready-made deployment scripts for the following environments:
- Linux (generic systemd deployment script)
- Docker
- K8s (via Helm Chart)
- Azure (via ContainerInstance)
- AWS ECS Fargate
- AWS AMI
Once the Connector is installed, run the registration command provided by Twingate. This command will register the Connector with your Twingate account and associate it with the network you created in stem 5.1
7.3 Access your protected Resources with the Twingate Client
Install the Client :
Visit get.twingate.com to install the Twingate Client application on your device.
7.4 Configure Access Policies
In the Twingate Admin Console, go to the “Access” tab and click on “Policies.” Here, you can define access policies to control who can access your server or application. You can set up policies based on user groups, IP ranges, or other criteria to ensure granular control over access permissions.
Bibliography
https://www.twingate.com/docs/quick-start
https://www.twingate.com/docs/define-a-remote-network
https://www.twingate.com/docs/connectors
https://www.twingate.com/docs/quick-start#install-the-client
https://get.twingate.com/
https://medium.com/@itruss17/a-step-by-step-guide-to-installing-and-setting-up-twingate-on-your-server-96947e893ba2
https://www.civo.com/learn/categories/twingate
https://www.twingate.com/blog/synology-nas
https://www.virtualizationhowto.com/2022/06/twingate-download-and-configuration-review-of-zero-trust-vpn/ \